Backyard games are a fantastic way to enjoy time outdoors, and one classic game that never goes out of style is the bean bag toss. This fun, competitive game is easy to set up and perfect for gatherings, barbecues, and casual hangouts. If you’ve been looking for a creative and enjoyable project to liven up your backyard, creating your very own DIY bean bag toss game is a perfect solution.
In this guide, we will walk you through every step of making a custom backyard bean bag toss game. Whether you are a beginner or have some experience with DIY projects, this comprehensive guide will provide you with clear instructions, helpful tips, and the best materials for creating your own version of this popular game.

Table of Contents:
- Materials You Will Need
- Step-by-Step Instructions to Build Your Bean Bag Toss Game
- Design and Customization Ideas
- Troubleshooting and Tips for Success
Materials You Will Need
Before getting started with building your DIY backyard bean bag toss game, you’ll need to gather all the necessary materials. Most of these items are easy to find and inexpensive. Here’s a complete list of what you’ll need:
Wood and Fabric
- 1/4″ plywood: The main material for the board. You’ll need two pieces for the two sides of the game.
- Mesh fabric (or other fabric): To create the pockets for the bean bags. If you don’t want to sew, you can use fabric tape as an alternative.
- 1×4 boards: Used to make the kickstand that supports the bean bag board.
- Wood glue: For attaching the kickstand and securing the various parts of the board.
- Rivet washers and medium-length rivets: These will be used to attach the mesh to the plywood.
Tools
- Jigsaw: For cutting the plywood and mesh.
- Power drill: With a 1/8″ drill bit to create holes for the rivets.
- Riveter: This tool will help you secure the mesh fabric to the plywood.
- Sewing machine or no-sew fabric tape: If you choose to use mesh, you’ll need this to create the pockets.
- Paint and brushes: To add color to your board and make it visually appealing. You can use any color combination that suits your style.
- Hinges: These are used to attach the kickstand to the back of the board.
- Sandpaper: To smooth out rough edges of the wood for a clean finish.
- Bowl or template: To trace the circles for the bean bag holes.
Optional but Helpful Items:
- Miter saw or circular saw: For cutting the 1×4 boards precisely.
- Stencils: To add decorative details or point values on the board.
- Spray sealant: For extra protection if you plan to leave your game outside in various weather conditions.
Step-by-Step Instructions to Build Your Bean Bag Toss Game
Now that you’ve gathered all the materials, it’s time to dive into the building process. This project will take a few hours, so plan accordingly, and be sure to follow each step carefully for the best results.
Step 1: Cut the Plywood to Size
The first step is to cut the plywood to the desired dimensions for your bean bag toss boards. Generally, a standard bean bag toss board measures 36 inches in width and 24 inches in height.
If your plywood sheets are larger than this, you’ll need to trim them down. Use a jigsaw or circular saw to cut two pieces of plywood to these dimensions. Make sure the edges are smooth by sanding them down after cutting.
Step 2: Trace the Bean Bag Holes
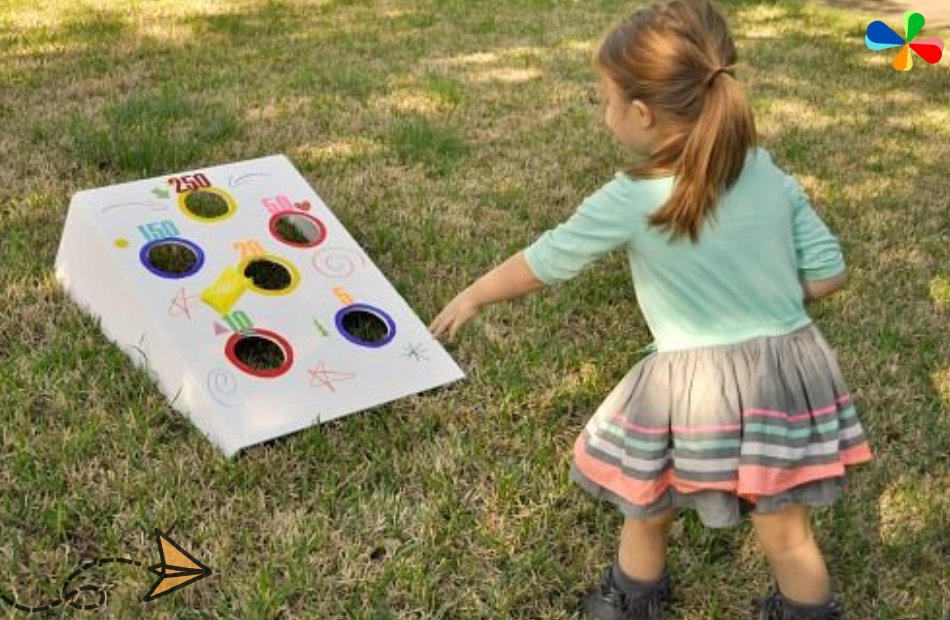
Next, you’ll need to create holes in the plywood where the bean bags will land. These holes are usually round and vary in size depending on personal preference, but a good starting point is to use a bowl as a template for tracing.
- Place the bowl on the plywood and trace six circles in a grid pattern. Two holes should be placed at the top of the board and two at the bottom, with the remaining two placed in the center.
- The size of the holes is typically around 5 inches in diameter, but you can adjust them based on your preference. If you want to make the game more challenging, make the holes smaller.
Step 3: Cut the Holes
Once you’ve traced the circles, use a jigsaw to carefully cut out the holes. If you’re cutting multiple holes, you can drill a small hole in the center of each circle to create an entry point for the jigsaw blade. This technique prevents the blade from damaging the surrounding wood.
Step 4: Prepare the Mesh Pockets
Now it’s time to create the pockets where the bean bags will land. Start by cutting out mesh fabric into small circles or squares to match the size of your holes. You’ll need a total of 12 pieces: two for each hole on both boards.
If you’re using a sewing machine, sew the edges of the mesh pieces into small pockets. Alternatively, use no-sew fabric tape to attach the fabric together, ensuring that the fabric forms a pouch large enough to catch the bean bags.
Step 5: Attach the Mesh to the Plywood
Once the mesh pieces are prepared, it’s time to attach them to the plywood. Start by positioning the mesh pockets over each hole, ensuring they align correctly.
- Drill small holes around the edges of the mesh and the plywood.
- Use rivets to secure the mesh to the board. Insert a rivet through each hole and use a riveter to expand the rivet, securing the fabric tightly against the wood.
- Be sure to attach a washer to each rivet before securing it to prevent the fabric from tearing.
Step 6: Add the Kickstand
To keep your bean bag toss board at the right angle during gameplay, you’ll need to add a kickstand. Cut two pieces of 1×4 wood to the desired length for the stand. Typically, the kickstand should be about 12 inches long.
- Attach the boards to the back of the plywood using wood glue and screws. Make sure the kickstand is positioned at a slight angle to ensure the board stays upright.
- Add hinges to the ends of the kickstand so you can fold it flat for storage.
Step 7: Paint and Decorate the Board
Now that the structure is assembled, it’s time to add color and personality to your bean bag toss game. You can use paint to create a custom design that reflects your style or the theme of your backyard.
Consider painting the background in one color and then adding accents, such as point values or team logos, to make the game look more professional. You can use stencils for a clean and uniform look, or simply freehand the designs for a more personalized touch.
Step 8: Final Assembly
Once everything is painted and dry, attach the kickstand to the back of the board using screws and hinges. This will allow the board to stand at an angle for playing.
You can also add a protective coat of spray sealant over the paint to help it withstand outdoor weather.
Design and Customization Ideas
While the classic bean bag toss game is fun as-is, there are several ways you can customize it to better suit your style or needs. Here are a few creative ideas that can make your DIY backyard bean bag toss game even more unique.
1. Theme Your Board
Adding a theme to your board can make the game even more exciting for players. Here are some ideas for customizing your board design:
- Sports Team Colors: Paint your board in the colors of your favorite sports team and add their logo. This will make it perfect for tailgating parties or sports-related gatherings.
- Beach or Summer Theme: Use light blue and sandy colors to give your board a beachy vibe. You can add beach ball designs or other tropical elements like palm trees.
- Wooden Rustic Look: If you prefer a more rustic or vintage appearance, stain the wood to give it a natural finish and paint on a simple design with large numbers for scoring.
- Holiday Themes: If you’re building this game for a specific holiday (such as Christmas or Halloween), create a themed board with decorations like snowflakes, pumpkins, or reindeer.
2. Adjustable Board Height
For those who want to make the game more versatile, adding an adjustable height feature can be a fun way to increase difficulty levels. For example, you could attach a sliding mechanism to the kickstand, allowing you to set the board at different heights. This would provide a challenge for both adults and kids, making the game adaptable for different age groups.
3. Add LED Lights for Nighttime Play
If you want to keep the fun going after sunset, consider adding LED lights to the edges of the board. These lights will not only make the game more visually appealing, but they’ll also allow you to play well into the evening. Use battery-operated LED strips that are weatherproof and attach them along the perimeter of the board. You can even install a light-up scoreboard for extra flair!
4. Upgraded Bean Bags
While standard bean bags work perfectly fine, upgrading them can add a bit more fun. Consider using:
- Weighted Bean Bags: If you prefer a heavier game, opt for bean bags filled with sand or small pebbles.
- Themed Bags: You can also customize the bean bags with different colors or materials, matching the theme of your board, or you could even create DIY bags that feature fun patterns or team logos.
5. Create a Portable Design
If you want to be able to take your bean bag toss game to different places, make the design foldable or easy to transport. Use lightweight plywood and attach the kickstand with removable screws or magnets. You could also design the game board to fold in half, making it more compact for storage or transport to a picnic or beach day.
6. Multiple Game Modes
If you’re creating your bean bag toss game for a group of people, adding more functionality can make it even more engaging. Consider adding multiple game modes such as:
- Point Variations: Instead of just the classic hole-in-the-board game, use different-sized holes that are worth different point values. You can place smaller holes worth higher points and larger holes for lower points.
- Team Play: Organize your guests into teams and have them compete against each other. You can mark different colors or zones on the board to indicate which hole belongs to which team.
- Skill Levels: Set up various levels of difficulty by changing the distance between players and the board. This makes the game more challenging for adults and allows kids to play at a closer range.
Troubleshooting and Tips for Success
Creating a DIY bean bag toss game is a rewarding experience, but like with any project, there may be challenges along the way. Here are some common issues you might encounter and tips for overcoming them.
1. Plywood is Too Thin
If you’re using thin plywood, there is a chance the board could warp over time, especially if left outside in the weather. To avoid this, you can:
- Use thicker plywood (3/8″ or 1/2″) if possible, which will make the board sturdier.
- Consider adding a supporting frame or using cross braces on the back of the board to keep it from bowing.
- Coat the board with a sealant or outdoor wood paint to protect it from the elements.
2. Mesh Doesn’t Stay Secure
If the mesh fabric doesn’t stay tightly in place after riveting, make sure to:
- Use the correct-sized rivets for the thickness of the plywood. Rivets that are too short may not provide enough grip.
- Reinforce the edges of the mesh with fabric glue before attaching it to the board, especially if you’re using fabric that’s prone to stretching.
- Double-check that the washers are securely positioned before you rivet them to avoid any movement.
3. Inconsistent Hole Sizes
When cutting out holes, it can be tricky to keep them all the same size, especially if you’re cutting multiple holes on one board. To maintain consistency:
- Use a template for the hole sizes and make sure it’s securely attached to the plywood before tracing.
- If you’re having trouble cutting clean edges with the jigsaw, try sanding the holes smooth afterward or use a hole saw for more precision.
- If you make a mistake, don’t worry! You can always cover up a slightly misshaped hole with decorative stencils or paint.
4. Board Isn’t Level
If the bean bag toss board doesn’t sit level or doesn’t stand upright, check the following:
- Ensure the kickstand is securely attached with screws and hinges. The hinges should allow the board to stand at the desired angle without tipping over.
- Adjust the height of the kickstand or add additional supports to make sure the board remains stable during gameplay.
5. Paint Peels or Chips
If the paint starts to peel or chip over time, this usually happens due to exposure to outdoor elements. To prevent this:
- Use a high-quality outdoor paint that’s specifically designed to withstand the elements.
- Apply a protective coat of clear sealant over the paint to provide an extra layer of defense against moisture and wear.
Final Thoughts and Conclusion
Building a DIY backyard bean bag toss game is an enjoyable and practical way to bring fun and excitement to your outdoor space. By following the steps outlined in this guide, you’ll not only create a custom game that suits your personal style but also provide a fantastic activity that can be enjoyed by family and friends for years to come. Whether you’re hosting a barbecue, planning a backyard party, or simply looking for a fun way to enjoy the outdoors, this game is guaranteed to entertain.
Here are a few final tips to help ensure your DIY bean bag toss game is a success:
- Customization: Don’t hesitate to get creative with your design. The beauty of making your own game is that you have complete control over the aesthetics and functionality. Whether it’s the paint colors, the addition of LED lights, or incorporating a specific theme, make the game your own.
- Durability: Since your board will likely be used outdoors, be sure to finish it with a weather-resistant coating to protect against rain, sun, and dirt. This will increase the longevity of your game, ensuring it stays looking great season after season.
- Safety: If you have children involved in the game, always supervise their play, especially when using tools like a jigsaw or power drill. Make sure the edges of the board are smooth to avoid any potential injuries.
- Adjustments: As you play the game, feel free to make any adjustments that improve the experience. Whether it’s adjusting the size of the holes or changing the bean bag weight, these tweaks can keep the game fresh and engaging for everyone involved.
Summary of Key Steps:
- Prepare the Materials: Gather plywood, mesh fabric, rivets, paint, tools, and kickstand materials.
- Cut the Plywood: Trim the plywood to the correct size for the board.
- Create Holes for the Bean Bags: Use a bowl or template to trace and cut out the bean bag holes.
- Make Mesh Pockets: Prepare mesh fabric to create the pockets where the bean bags will land.
- Attach the Mesh: Secure the mesh with rivets to the plywood, ensuring it’s tight and durable.
- Build and Attach the Kickstand: Use 1×4 boards to create a kickstand that will hold the board at an angle.
- Paint and Decorate: Personalize your board with custom paint and designs.
- Final Assembly: Attach the kickstand and apply any final touches, like sealing the paint for outdoor durability.
By following these steps and utilizing the tips provided, you’ll not only have a fun DIY project but also a long-lasting bean bag toss game that will be the highlight of your backyard.
If you’ve been looking for an exciting, low-cost, and customizable outdoor activity, creating a DIY backyard bean bag toss game is the way to go. It’s an excellent project for anyone, whether you’re looking to entertain your kids, spend time with friends, or add a new feature to your backyard.
Happy building, and enjoy the game!


